Reverse Engineering : The Portable Executable File Format

In this post, I will be talking about The Portable Executable File Format. For reversing our next target we must be familiar with PE file format.

PE File Format

  The PE file format is a data structure, a file format for executable files for Windows OS(32 bits and 64 bits). It contains all the necessary information required by the OS loader to manage the wrapped exe file. 

Basic Structure of PE :

The PE file structure is organized as linear stream of data. The table below explains it in a better way.

The table above is the basic structure of a PE file, every file starts with a DOS header followed by DOS Stub, then by PE Header, and then the rest. Each section needs a little explanation so that we can understand the need of this topic in RE. So let us start.

DOS Header(MZ Header) :
  • In any PE file, the initial 64 bits are occupied by the DOS Header. This is also known as the MZ header after the name of Mark Zibolosky( one of the developers of DOS ). Also the first two bytes in each file are 4D and 5A respectively( which when converted to ASCII converts to  MZ ). 
  • The function of the DOS Header is to check if the environment is suitable for the application or not(that is if the application can run on the OS or not) and run the DOS Stub.
  • The last four bytes of the DOS Header is a PE Header pointer which points to the PE Header.For example, let us say the last four bytes are "00 00 01 00" then the address at which the PE header must start is "00 00 10 00 + the base address". The address is inverted here because it is going to be stored in reverse order in the stack.
  • Followed by these four bytes is the DOS Stub. 

DOS Stub :


  •  When we are developing an application in windows the linker(windows linker) automatically adds a default stub program to the application, this stub program is the DOS Stub and the Stub can also be overridden by substituting it with a different but valid DOS program.
  • The Stub is placed just after the DOS Header.
  • This default stub program is known as "winstub.exe".
  • The stub contains the statement like "This application is not supported on this version of Windows" which are displayed depending upon the DOS Header.

The PE Header :

  • The PE Header contains important information(like physical and logical structures of the code) which is used by the loader.
  • This header is a general name for IMAGE_NT_HEADERS structure.
  • The header has three members and these are Signature, File Header, and Optional Header.
  • All of the three members store different information.  As the name suggests the signature is the signature of PE File, is of 4 Bytes( DWORD ), and has values 50 45 00 00 stored in the respective 4 bytes.
  • The File Header stores the information about the physical layout of the PE file, like the number of sections present in the file.
  • The Optional Header contains the information about the logical layout of the PE file. For example address of entry point( AddOfEntryPoint ).
 We need to learn more about he Optional header for understanding the relation of PE files with RE.
So let us first see these
Address Of Entry Point : It stores the RVA of the first instruction that sis going to be executed when the file is run. From a Reverser's point of view, if changes are to made in the flow of the execution, this is the place where changes have to made.
Data Directory : This is the final section of Optional Header, it occupies 128 Bytes of space. This is because this is an array which relates to the important data structures in PE file.

Section Table :

  • It is an array, this array also contains information about each  PE File Section present in hte PE file.
  • For each section in PE file, there will be an entry in the Section Table.

PE File Section : 

  • These are those areas of the PE file where all the data is present.
  • This contains the codes, data, resources and other stuff.
  • Each section has a header and a body, the body though does not have a fixed structure.
An application typically has 9 sections, the table below explains the 9 sections.


It is not necessary that every application will have 9 section but it is compulsory to have at least two  section.

This is all for this post, In the next post we will be focusing on the PE header and the use of Olly to reverse our target app. 

Reverse Engineering : Finalising the patches and save the file


Finalising the patches

For finalizing the patches and saving the changes that we have made. We first have to reload the code then modify the code a little(these modifications are going to reflect the same behavior as did by the flags after flipping). After all this we just have to save the code with a different name. The procedure is elaborated below.

Step 1

  • After reloading the app on Olly, we make a few changes in the code( at the places where we tried to avoid the error message).
  • The first change would be the JNZ instruction. The JNZ instruction is changed to JMP, as this jumps the entire CALL block it was about to follow.

  • We follow the exact same procedure for another JNZ (after the TEST instruction)
  • To do all this we have select each instruction(double click). We will see a dialogue box make the changes in the dialogue box and click on execute and then cancel. 


The two images above depicts the two scenarios, one with the JNZ instruction and other with the JMP isntruction.

Step 2

    • The next instruction is the JL instruction, the one of the option available is to perform no operation instead of JL. And this could be done by replacing the JL with NOP(stands for no operation performed).
    • To do this double click on the instruction and then replace the whole statement with “NOP” then select “fill with nop” check box at the left bottom and click on execute and then on cancel.

    Note -: We could have also used the JMP instruction instead of NOP.

    The images above again shows the two scenarios.

    Step 3

    Next we have is one more JL instruction this could easily be avoided by using the same process mentioned in the Step 2.


    Step 4

    In this step we are going to save the changes to a new exe file which will be error free.
    • Select the area we have made the changes
    • Right click on the shaded area
    • Go to “edit” and then click on “copy to executable”

    • We see a smaller window of the executable instructions. Right click on the window and choose the save option to save the file.

    Step 5

    • open the new file and run it we will see the congrats message box.   
    • We will see the congrats message box on running the app now.
    This was the last part of the first tutorial from series of R.E. I will continue to post more lectures on R.E. and other topics as well. For any query you can leave a comment below or contact me directly.

    Reverse Engineering : Using Olly to crack reverseMe.exe


    In this post we will learn how to reverse an app. Our target is reverseMe.exe and the application we are going to use is OllyDbg. To understand this post properly you must  refer to the Revere Engineering : intro to Olly and Registers and Flags posts first.

     Step 1

    • Start Olly
    • Open the reverseMe.exe file.
    • Choose the cpu main thread window.

    Step 2

    • Now we need see what happens when we run the app, so press f9 or just click on the run button.
    • The next thing we is the message box with the purchase error.

    Step 3

    • Now we need to restart the app, press the restart button from the toolbar (probably the second option on the toolbar).
    • Now we will move on to each instruction and run each of them to see what exactly causes the message box to appear. We can do this by pressing f8, this will execute each instruction and move to the next one.
    •  Also our focus should be on the changes happening in different windows (specially the registers and flags).
    • The black arrow points to the CMP instruction and the message. 
    • While executing each instruction one by one, we see a instruction whose corresponding comment is the error we see in the message box. A few lines above this instruction we see a CMP (compare) statement then a JNZ (jump on not zero) statement (if this CMP statement results into a zero then the jump does not take place and the next instruction is executed).
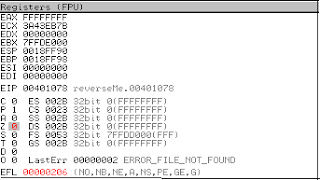
    Now let us understand this CMP statement. It is comparing the value in accumulator register (EAX) with  -1. The value in EAX is -1 due the CALL instruction just above the CMP statement. What the CALL instruction has done is, it has checked for a file with the key of the app, and when the key did not match it updated EAX to 1. The result of the CMP instruction is stored in the flag Z. now if we wish to change the result of the CMP statement we can just flip the value of Z (I guess this should do fine). 

    • The Register window, and the value of the Z flag has been flipped. 
    • Restart the app and reach the CMP instruction and then flip the Z flag and then continue the process of executing the app. Now we notice that the error is passed.
    • We will continue the process of removing the reasons of failure, Next in the list we find a TEST instruction with a JNZ instruction, and just next to it this JNZ instruction gives us a hint that the reason might be the TEST instruction. A few instructions above the TEST instruction we see a PUSH instruction pushing the EAX in the stack and what’s now going to happen is comparing the values in the accumulator register and with a file that is going to be read in the next call.

    The TEST instruction performs an AND operation between the two inputs, this instruction also updates the value of Z, S, O flags (depending upon the values of the two inputs). 
    • If the value of EAX is 0 the Z flag is in clear state. The JNZ instruction does not perform jump if the Z flag is in clear state (which in this case is not happening).
    • The arrow points to the TEST instruction. 
    • What happens if this jump is avoided next comes the unconditional jump and this jump instruction results into the failure of the app.
    • Now what we have to do is clear we have to pass this JMP instruction and this could be done if Z flag is in clear state. So make it happen.

    • Notice the value of S flag it is zero before executing the TEST instruction. And the value of Z have been flipped.
    • Now we are at the last lap of our run, we got to run each instruction again looking at the window we see there is JL instruction, for this JL instruction we have to update the S flag instead of Z. Now we have passed this, moving on with the same procedure leads us to the message box with the congratulation message.


    • The value of S changes as soon as the Instruction is executed. We have to flip this to 0 to avoid the message box
    • Let us run the app now we see the app running properly.
     We cannot always follow the same procedure (as it is very lengthy). So we need to save the changes made in the app. We will learn this in the next post. Also We have many more procedures to reverse apps as this is very lengthy process so we will look at different procedures to do this in further posts.

    Registers and Flags

    For a deeper understanding of reverse engineering we need to know the basic functions of the registers and the flags from the register window (right most window in CPU-main thread of Olly).

     Registers


    The register in the computer architecture is storage place. A register can hold memory address,  or instructions. These registers are very small and very fast. And these are used in the execution process of the CPU. We are going to learn about the 9 CPU registers in this post.

    The nine registers being:

    The table above depicts the operations of the 9 CPU registers. 

    Flags

    The "flags" are one bit of memory present in the processor. Since each flag is only one bit it is either 1 or 0 ("set" or "clear") . There are six flags which are used to indicate the result of certain instructions. A few instructions like "CMP", "TEST", and "JNZ". 

    The six flags being:
    The table above show the uses of the six flag registers.

    Now we a basic understanding of the functionality of the 9 registers and the flags. This understanding will make it easier to understand why the values of the particular flags will be flipped for a particular instruction.  Majorly we will be focusing on three flags C,Z and O flags. 


    Reverse Engineering : Intro to Olly

    Reverse Engineering

    This is the process of generating a useful product by using the design and components of a pre existing product. In computer world Reverse Engineering is used to study the functionality of the software and compute the logic and code behind it The basic aim behind this is to make a copy of the software. I am going to use Reverse Engineering to crack softwares. I will be using OllyDbg for this purpose. 

    Introduction to OllyDbg

    Firstly I'll introduce Olly, and the different windows we see on while reversing an app.Olly is a third level Debugging(assembler level analysing) tool for Windows. For downloading Olly visit the link  The picture below is the first screen we see when we open Olly.

     The next step would be to load the file we are going to reverse and run it. For downloading reveseMe.exe visit the link


    Now select the reverseMe

    Let us first try to understand what the different sections on the window are, let us go from left to right and then the bottom ones 

    • The leftmost section is the "virtual address" window. The next two in the order are the "opcode" section and "mnemonics" section, opcode stands for operation code, in simple language this is code for the instructions in  assembly language.And mnemonics are the conversion of opcode readable to humans. Next up is the comment section Olly has made our work easier by including this section in the window.
    • Now the rightmost section, it is the "Register window" here we have the 9 CPU registers and a few flags. At the top we have the 9 CPU registers . We see 8 Flags just below the registers, out of these 8 flags most of our work will be concerned with only of them, the three  being "C", "Z", and "O". 
    • Now in the right bottom we have the Stack window, here we can notice the changes happening on the stack(as the instructions are executed). In the left bottom we have the "Dump window".
    • The window in the middle or just above the Dump window is the Pane window, In this window we see whats is going to happen in the next instruction
    We have covered all the different windows  present on the CPU - main thread of Olly. Now we will move on to a few shortcuts, apart from the icons on the toolbar Olly provides shortcuts and a few of them are

    Shortcuts

    f8   : This button is used to run the application by executing each instruction in the respected order.
    f9   : This is used to run the debugged application.
    f12 : Pause button.
    f7   : This performs the same function as that performed by f8 but we a "CALL" statement is encountered this follows the instruction inside the call.

    For better understanding of the registers and flags follow the link Registers and Flags

    Now we have a basic knowledge about OllyDbg. We will reverse the first application in the next part